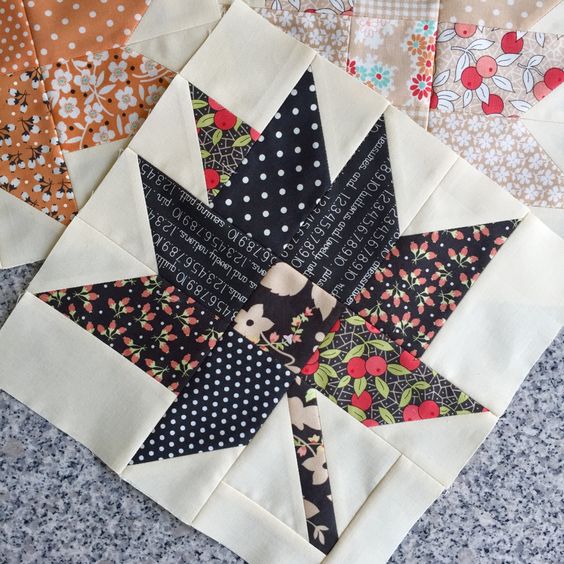
The Falling Leaves Quilt Block – Free Pattern is a delightful way to bring the warmth and color of autumn into your quilting projects. This pattern, inspired by the graceful descent of leaves in the fall, is perfect for quilters of all levels.
The intricate design captures the essence of the season, making it a timeless addition to any quilt. Whether you’re a seasoned quilter looking for a new project or a beginner eager to try something creative, this quilt block offers a great way to celebrate the beauty of nature through your craft.
Creating a Falling Leaves Quilt Block is not only about the joy of quilting but also about connecting with the serene beauty of nature. The pattern’s flowing lines and varied shapes mirror the unique and unpredictable paths that leaves take as they fall from the trees. This makes each block unique, allowing for endless customization in terms of color, fabric choice, and layout.

In this article, we will guide you through the process of making the Falling Leaves Quilt Block, offering tips on fabric selection, color coordination, and stitching techniques. We’ll also explore creative ways to use this block in your quilting projects and answer some common questions to help you get the best results.
1. Understanding the Falling Leaves Quilt Block
The Inspiration Behind the Design
The Falling Leaves Quilt Block is inspired by the natural beauty of autumn. As leaves change color and gently fall to the ground, they create a tapestry of reds, oranges, yellows, and browns. This quilt block captures that beauty, translating the imagery of falling leaves into fabric form. Each block is a representation of the season’s charm, making it a perfect addition to quilts that evoke warmth and comfort.
Choosing the Right Fabrics
When creating a Falling Leaves Quilt Block, fabric selection is crucial. The design’s success hinges on your ability to replicate the colors and textures of autumn leaves. Opt for fabrics in rich, warm tones—think deep reds, burnt oranges, golden yellows, and earthy browns. Consider using batiks or fabrics with subtle gradients to mimic the natural variations found in leaves.
The Importance of Color Coordination
Color coordination plays a vital role in the Falling Leaves Quilt Block. To achieve the desired effect, select colors that complement each other while staying true to the autumn palette. Combining lighter and darker shades within the same block can add depth and dimension, making your quilt visually appealing and dynamic.
Understanding the Block’s Structure
The Falling Leaves Quilt Block typically features a combination of triangles and squares, arranged to resemble a leaf’s shape. The use of half-square triangles (HSTs) is common, as they allow for sharp angles that mimic the pointed edges of leaves. This structure not only makes the block visually interesting but also provides a satisfying challenge for quilters.
Tips for Cutting and Piecing
Precision is key when cutting and piecing the Falling Leaves Quilt Block. Start by carefully measuring and cutting your fabric pieces, ensuring that all your triangles and squares are the correct size. When piecing, use a quarter-inch seam allowance and press your seams carefully to avoid bulk. This attention to detail will result in crisp, well-defined blocks that fit together seamlessly.
Variations and Customizations
One of the joys of the Falling Leaves Quilt Block is its versatility. You can easily customize the block to suit your project. Consider experimenting with different sizes, creating smaller leaves for a more delicate look or larger leaves for a bolder statement. You can also vary the number of leaves in each block, adding multiple leaves for a more complex design or focusing on a single leaf for simplicity.
2. Step-by-Step Guide to Creating the Falling Leaves Quilt Block
Step 1: Gathering Your Materials
Before you begin, gather all the materials you’ll need for your Falling Leaves Quilt Block. This includes your chosen fabrics, a rotary cutter, a cutting mat, a ruler, and a sewing machine. Make sure your fabrics are pre-washed and ironed to avoid any shrinkage or distortion later on. Having everything ready before you start will make the process smoother and more enjoyable.
Step 2: Cutting Your Fabric Pieces
Start by cutting your fabric into the required shapes. For a traditional Falling Leaves Quilt Block, you’ll need to cut squares and triangles from your chosen fabrics. Pay close attention to the size and number of pieces required, as precision in cutting will greatly affect the final appearance of your block. Use your rotary cutter and ruler to ensure straight, accurate cuts.
Step 3: Assembling the Leaf Components
Begin assembling the leaf components by creating the half-square triangles (HSTs). To do this, place two squares of contrasting fabrics right sides together, draw a diagonal line from corner to corner, and sew a quarter-inch seam on either side of the line. Cut along the drawn line to create two HSTs. Press the seams open or to one side, depending on your preference.
Step 4: Constructing the Block
Once your HSTs are ready, begin laying out your Falling Leaves Quilt Block. Arrange the HSTs and squares to form the shape of a leaf. Ensure that the angles of the triangles align correctly to create the leaf’s points. When satisfied with the layout, sew the pieces together row by row, pressing the seams as you go. Then, join the rows to complete the block.
Step 5: Adding the Stem (Optional)
For a more detailed Falling Leaves Quilt Block, consider adding a stem. This can be done using a strip of fabric or by appliquéing a stem shape onto the block. If using a strip, carefully sew it between the squares and triangles where the leaf stem would naturally appear. This small addition can enhance the realism of your block and add another layer of detail.
Step 6: Final Pressing and Trimming
After completing the block, give it a final press to ensure all seams are flat and the block is square. If necessary, trim the edges to ensure that your block is the correct size and that all sides are even. This final step is crucial for ensuring that your blocks fit together perfectly when assembling your quilt top.
3. Creative Ways to Use the Falling Leaves Quilt Block
Incorporating into a Full Quilt
The Falling Leaves Quilt Block is a natural choice for autumn-themed quilts. Whether you choose to make a full quilt with repeated blocks or mix it with other seasonal designs, this block adds warmth and texture to any quilt. Consider alternating the direction of the leaves for added movement and visual interest.
Designing a Table Runner
A table runner featuring the Falling Leaves Quilt Block can be a stunning addition to your fall décor. Use a combination of leaves in different colors to create a runner that celebrates the beauty of the season. The elongated shape of a table runner allows you to play with block placement and create a flowing design that mimics the natural scattering of leaves.
Making Decorative Pillows
Turn your Falling Leaves Quilt Block into a decorative pillow cover that brings a touch of autumn to your living space. This is a great way to showcase a single block or experiment with different color combinations. Adding piping or a border around the block can give the pillow a polished, finished look.
Creating a Wall Hanging
A wall hanging made from the Falling Leaves Quilt Block can serve as a beautiful seasonal decoration. Whether you make a small piece with a single block or a larger hanging with multiple blocks, the design will bring the colors of fall into your home. This project is perfect for using up fabric scraps and experimenting with different layouts.
Crafting Unique Coasters
For a quick and satisfying project, consider making coasters featuring the Falling Leaves Quilt Block. These small-scale blocks are perfect for practicing your piecing skills and using up small fabric remnants. The finished coasters make wonderful gifts or add a festive touch to your own home during the fall season.
Combining with Other Quilt Blocks
The Falling Leaves Quilt Block pairs beautifully with other seasonal or nature-inspired blocks. Consider combining it with pumpkin, acorn, or tree blocks to create a quilt that celebrates all aspects of autumn. The versatility of the leaf design allows it to complement a wide range of other patterns, making it a valuable addition to your quilting repertoire.
4. Tips for Perfecting Your Falling Leaves Quilt Block
Precision Cutting for Clean Lines
To achieve the best results with your Falling Leaves Quilt Block, precision cutting is essential. Take your time when measuring and cutting your fabric pieces, and use sharp tools to ensure clean, straight edges. This will make the assembly process smoother and result in a more professional-looking block.
Experimenting with Color Gradients
One way to add depth and interest to your Falling Leaves Quilt Block is by using color gradients. Choose fabrics that transition from light to dark within the same color family to mimic the natural shading found in leaves. This technique can create a more dynamic and visually appealing block.
Pay Attention to Seam Allowances
Consistent seam allowances are crucial for ensuring that your Falling Leaves Quilt Block fits together properly. Use a quarter-inch seam allowance throughout, and check your seams regularly to make sure they are accurate. Even small deviations can add up, leading to blocks that don’t align correctly.
Pressing Matters
Pressing your seams as you go is important for achieving a flat, even block. Press seams to one side or open, depending on your preference, but be consistent throughout the block. A well-pressed block is easier to assemble and will lay flat in your finished quilt.
Playing with Block Size
Don’t be afraid to experiment with the size of your Falling Leaves Quilt Block. While traditional blocks are often around 12 inches square, you can create smaller or larger versions depending on your project. Smaller blocks can be more challenging to piece, but they offer a delicate and detailed finished product.
Using a Design Wall
A design wall can be incredibly helpful when working on a quilt that incorporates the Falling Leaves Quilt Block. Arrange your blocks on the wall before sewing them together to see how the colors and patterns work together. This step allows you to make adjustments and perfect your layout before committing to the final assembly.
FAQ
1. How difficult is the Falling Leaves Quilt Block?
The Falling Leaves Quilt Block is moderately challenging, making it suitable for confident beginners and experienced quilters alike. The design involves basic piecing techniques, but precision is important to ensure the block comes together correctly.
2. Can I use different fabric types for this quilt block?
While cotton is the most common fabric used for quilt blocks, you can experiment with different types of fabric for the Falling Leaves Quilt Block. Just be mindful of how different fabrics behave, especially when it comes to stretching and shrinking.
3. How many Falling Leaves Quilt Blocks do I need for a full quilt?
The number of blocks needed depends on the size of your quilt. For a standard throw-size quilt, you might need around 20-30 blocks, while a larger bed quilt will require more. Consider the size of your blocks and the overall layout when planning your quilt.
4. What’s the best way to quilt the Falling Leaves Quilt Block?
There are many ways to quilt the Falling Leaves Quilt Block. You could echo quilt around the leaf shapes, use free-motion quilting to add texture, or create a simple grid. Choose a quilting method that enhances the block’s design and suits your skill level.
5. Can I make a scrappy version of this quilt block?
Absolutely! A scrappy Falling Leaves Quilt Block can be a fun and creative way to use up fabric scraps. Mix and match different fabrics within the same color family to create a cohesive yet varied look that adds charm to your quilt.
6. How do I ensure my quilt block is square?
To ensure your Falling Leaves Quilt Block is square, measure carefully when cutting your pieces, maintain consistent seam allowances, and trim the block after assembly if needed. Use a square ruler to check the accuracy of your block as you go.
Join our VIP broadcast list and gain access to exclusive patterns, all for free. As a VIP member, you’ll receive the best patterns daily, delivered directly to your device. ✨📱 It’s a unique opportunity to stay up-to-date with the latest trends and designs, curated just for you. Don’t miss out on enhancing your projects and discovering new inspirations with the best patterns every day! 🎨🔝
Conclusion
The Falling Leaves Quilt Block – Free Pattern is a beautiful way to bring the essence of autumn into your quilting projects. By following the steps and tips provided in this article, you can create stunning quilt blocks that capture the vibrant colors and graceful lines of falling leaves. Whether you use this block in a full quilt, a decorative pillow, or a wall hanging, it’s sure to become a cherished part of your quilting repertoire.
We’d love to hear about your experiences with this pattern and see your finished projects. Please share your thoughts and suggestions in the comments below. Happy quilting!


