Creating a quilt can be a deeply satisfying experience, especially when you have a pattern that is both visually stunning and easy to follow.
The Snail Trail Easy Block Quilt Tutorial – Free Pattern offers just that, combining a beautiful spiral design with straightforward instructions that are perfect for quilters of all skill levels.
This pattern not only allows you to create a striking quilt but also offers flexibility in terms of fabric choices and quilt size. Whether you’re an experienced quilter or just starting out, this tutorial will guide you through each step of the process, ensuring that you end up with a quilt you can be proud of.

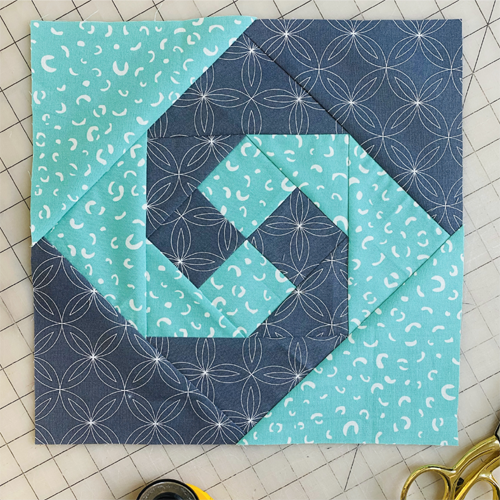
The Snail Trail Easy Block Quilt is known for its captivating spiral design, which resembles a snail’s shell. This design, while intricate in appearance, is surprisingly simple to construct thanks to the detailed instructions provided in the free pattern.
The pattern breaks down the process into manageable steps, making it accessible even for those who may be new to quilting. With a little patience and creativity, you’ll be able to produce a quilt that looks complex but is actually quite easy to make.
One of the great advantages of the Snail Trail Easy Block Quilt Tutorial – Free Pattern is its adaptability. The pattern can be customized to suit your personal style, whether you prefer bold, vibrant colors or a more subdued, monochromatic palette.
Additionally, the size of the quilt can be adjusted depending on your needs, whether you’re making a cozy lap quilt or a large bedspread. In the following sections, we’ll explore the key aspects of this pattern, including fabric selection, assembly tips, and finishing touches.
1. Understanding the Snail Trail Easy Block Quilt Pattern
The Snail Trail Easy Block Quilt Tutorial – Free Pattern begins with understanding the unique design that gives this quilt its name. The Snail Trail pattern is characterized by a series of spirals that create a dynamic, swirling effect.
Each block consists of a central square that is surrounded by triangles, which form the distinctive spiral as they radiate outward. This pattern is visually interesting and lends itself to a variety of color combinations.
To begin, the tutorial provides a clear, step-by-step guide on how to create the basic Snail Trail block. It starts with cutting your fabric into precise squares and triangles. Accuracy in cutting is crucial for this pattern, as the pieces need to fit together perfectly to form the spiral. The pattern includes a helpful guide on the dimensions for each piece, ensuring that even beginners can achieve the correct sizes.
Once your fabric pieces are cut, the next step is to start assembling the block. The Snail Trail Easy Block Quilt Tutorial – Free Pattern walks you through this process, beginning with the central square and working outward. The key to success with this pattern is maintaining consistency in your seam allowances, as even small variations can affect the overall look of the spiral.
As you work through the tutorial, you’ll find that the Snail Trail pattern is surprisingly forgiving. While it may appear complex, the repetition of the basic block makes it easier to master with practice. The tutorial encourages you to take your time with each block, ensuring that your seams are straight and your pieces align correctly.
The Snail Trail pattern is also incredibly versatile. By simply changing the color placement within the blocks, you can create a completely different look. The tutorial provides examples of various color schemes, from traditional two-color designs to more modern, multi-colored versions. This flexibility allows you to personalize the quilt to match your taste or the decor of the room where it will be displayed.
2. Choosing the Right Fabrics for Your Snail Trail Quilt
Fabric selection is a critical step in creating a beautiful Snail Trail Easy Block Quilt. The right choice of fabrics can enhance the spiral effect of the pattern and bring your quilt to life. Here are some tips to help you choose the best fabrics for your quilt.
First, consider the color scheme you want to achieve. The Snail Trail pattern works well with both bold, contrasting colors and more subtle, complementary shades. If you’re aiming for a dramatic effect, opt for high-contrast colors such as black and white or navy and yellow. For a more subdued look, choose fabrics in the same color family, with varying shades to create depth.
Next, think about the scale of the prints on your fabrics. Since the Snail Trail block features relatively small pieces, large-scale prints may not work well, as the design could be lost in the cutting process. Instead, opt for smaller prints, solids, or tone-on-tone fabrics that will maintain their visual impact even when cut into smaller pieces.
Texture is another important consideration. Mixing different fabric textures can add an extra dimension to your quilt. For example, combining smooth cotton with a more textured fabric like linen or chambray can create a tactile contrast that enhances the overall look and feel of the quilt. However, be mindful of the thickness of the fabrics, as mixing fabrics of significantly different weights can make sewing more challenging.
When selecting fabrics, it’s also important to consider the durability of the materials. Quilts are often washed and used regularly, so choosing high-quality, durable fabrics will ensure that your quilt stands the test of time. Cotton is a popular choice due to its softness, breathability, and durability, making it ideal for a quilt that will be used frequently.
Finally, don’t be afraid to experiment with color and texture combinations. The Snail Trail Easy Block Quilt Tutorial – Free Pattern is designed to be adaptable, so you can tailor your fabric choices to match your personal style or the intended recipient of the quilt. Lay out your fabric choices before you start cutting to see how they work together and make any adjustments as needed.
Once you’ve selected your fabrics, be sure to pre-wash them. This will prevent any shrinkage or color bleeding later on, ensuring that your finished quilt looks as good as the day you made it. After washing, iron your fabrics to remove any wrinkles, making them easier to cut and sew.
3. Assembling Your Snail Trail Quilt Blocks
With your fabrics chosen and prepared, it’s time to move on to assembling the quilt blocks. The Snail Trail Easy Block Quilt Tutorial – Free Pattern provides a straightforward approach to putting the blocks together, ensuring that even beginners can achieve great results. Here’s how to proceed with the assembly.
Start by organizing your cut fabric pieces. Lay them out according to the pattern’s instructions, grouping the squares and triangles by color and size. This will make it easier to keep track of your pieces as you work through the assembly process.
Begin with the center square. This is the foundation of your Snail Trail block, and getting it perfectly aligned is key to the success of the spiral. Sew the first set of triangles to the sides of the square, taking care to match the edges precisely. Press the seams as you go, either open or to one side, depending on your preference.
Next, add the second set of triangles. This step is where the spiral effect starts to become visible. The tutorial emphasizes the importance of consistent seam allowances here, as even a slight variation can throw off the alignment of the spiral. Take your time with each seam, and double-check that your pieces are lining up correctly before sewing.
As you continue to add layers to the block, you’ll see the spiral design take shape. The Snail Trail Easy Block Quilt Tutorial – Free Pattern guides you through each step, with tips on how to keep your seams straight and your blocks square. If you’re new to quilting, this is a great opportunity to practice your piecing skills in a way that’s both challenging and rewarding.
Once all the triangles are sewn onto the block, it’s time to trim the edges to square up the block. This step is crucial for ensuring that all your blocks are the same size, which will make the final assembly of the quilt top much easier. Use a ruler and rotary cutter to trim the edges, being careful not to cut into the seams.
After you’ve completed one block, repeat the process for the remaining blocks. The tutorial recommends making all the blocks before moving on to the final assembly of the quilt top. This allows you to experiment with the layout and make any adjustments before sewing the blocks together.
Finally, lay out your completed blocks to determine the final arrangement. The Snail Trail Easy Block Quilt Tutorial – Free Pattern suggests several possible layouts, but feel free to create your own design. Once you’re happy with the layout, sew the blocks together to complete the quilt top.
4. Finishing Your Snail Trail Quilt
With the quilt top assembled, the next step in the Snail Trail Easy Block Quilt Tutorial – Free Pattern is finishing the quilt. This involves layering, quilting, and binding, all of which contribute to the durability and appearance of your quilt. Here’s how to complete these final steps.
First, prepare your backing fabric and batting. The backing should be slightly larger than the quilt top to accommodate any shifting during the quilting process. Lay the backing fabric out flat, then place the batting on top, followed by the quilt top. Smooth out any wrinkles, and use pins or basting spray to hold the layers together.
Quilting is the next step, and it’s where your quilt really starts to come to life. There are many quilting options available, from simple straight-line quilting to more complex free-motion designs. The Snail Trail Easy Block Quilt Tutorial – Free Pattern suggests starting with a basic quilting pattern if you’re new to quilting. Straight-line quilting, either in the ditch or echoing the spiral design, is a great way to highlight the Snail Trail pattern without overwhelming the design.
As you quilt, work from the center of the quilt outwards. This helps to prevent any puckering or shifting of the layers. Take your time, and check your work frequently to ensure that your stitches are even and that the layers are staying flat.
Once the quilting is complete, the next step is to trim the edges of the quilt. This prepares the quilt for binding and ensures that all the layers are even. Use a rotary cutter and ruler to carefully trim the excess batting and backing fabric.
Binding the quilt is the final step. The binding not only finishes the edges but also adds an extra touch of color and contrast. The Snail Trail Easy Block Quilt Tutorial – Free Pattern provides instructions for creating and attaching the binding, including tips on how to get neat, mitered corners. Choose a binding fabric that complements your quilt, and sew it on with a consistent seam allowance.
After the binding is attached, fold it over to the back of the quilt and hand-stitch it in place. This step requires patience, but it’s worth it for the clean, professional finish it provides. As you stitch, make sure the binding covers the stitching line from the front, and take care to keep your stitches small and even.
Finally, give your quilt a good press to smooth out any wrinkles and set the seams. Your Snail Trail Easy Block Quilt is now complete and ready to be enjoyed!
FAQ
Q: Is the Snail Trail Easy Block Quilt Tutorial – Free Pattern suitable for beginners?
A: Yes, the tutorial is designed with beginners in mind. The instructions are clear and detailed, making it easy to follow even if you’re new to quilting.
Q: What size should I make my quilt?
A: The size of your quilt can be customized depending on your needs. The tutorial provides guidelines for adjusting the pattern to create anything from a small lap quilt to a larger bedspread.
Q: Can I use different fabrics for each block?
A: Absolutely! The Snail Trail pattern is very versatile, and using different fabrics for each block can create a unique, scrappy look that adds character to your quilt.
Q: How do I ensure my blocks are all the same size?
A: Consistent seam allowances and careful trimming are key to ensuring that all your blocks are the same size. The tutorial provides tips on how to achieve this, including checking your seams as you sew and trimming the blocks before assembly.
Q: What type of batting should I use?
A: The type of batting you choose depends on your personal preference and the intended use of the quilt. Cotton batting is a popular choice for its softness and ease of quilting, but you can also use polyester or wool batting for different effects.
Q: How long does it take to complete the quilt?
A: The time it takes to complete the quilt will vary depending on your experience level and how much time you can dedicate to the project. On average, it might take a few weeks to complete from start to finish.
Join our VIP broadcast list and gain access to exclusive patterns, all for free. As a VIP member, you’ll receive the best patterns daily, delivered directly to your device. ✨📱 It’s a unique opportunity to stay up-to-date with the latest trends and designs, curated just for you. Don’t miss out on enhancing your projects and discovering new inspirations with the best patterns every day! 🎨🔝
Conclusion
The Snail Trail Easy Block Quilt Tutorial – Free Pattern is a fantastic project that combines beauty, creativity, and simplicity. Whether you’re an experienced quilter or just starting out, this pattern offers a rewarding experience that results in a stunning quilt.
We hope this tutorial has provided you with the guidance and inspiration you need to get started. If you have any questions or feedback, please leave a comment below with your honest opinion and suggestions. Happy quilting!


